Go outside between dusk and dawn using whatever existing light is available recognizing its color and mood, make a photograph that is surprising by what it reveals.
Post a photograph that you like the lighting and that you wish to emulate. Sketch out how you think it was lit. You can use this file to make your sketch:
http://www.diyphotography.net/lighting-diagrams

Tuesday, November 26, 2013
Wednesday, November 20, 2013
Lesson 12 Stop Action
Not Good!

Curtain showing on various shutter speeds.

Using the PocketWizard FlexTT5 on HSS mode as a receiver (images from the PM Class after downloading firmware update and keeping the settings to the default C1)


The HiViz SK2 Sound Trigger is an inexpensive way to set off a strobe with sound.
An explanation of Paul C Buff Einstein strobe to show the two different ways strobe manufactures control the flash output and what that has to do with stopping power and color temperature.
Another blog that we looked at about using the PocketWizard FlexTT5 on High Speed Sync (HSS) mode you could sync our studio strobes at a 1/8,000 sec.
Assignment 12 Stop Action
Photograph something in action that you can’t see with the naked eye. Use a camera and flash combination on manual attached to the hot shoe or the off camera cord. The flash should be dialed down to 1/16 power or less in order to achieve a flash duration of 1/10,000 or less. Examples are splashing water or stopping a fans blades with a ribbon attached. I want these images super sharp with no blurs.
Tuesday, November 12, 2013
Lesson 11 Light Painting
Light painting with a small LED flashlight
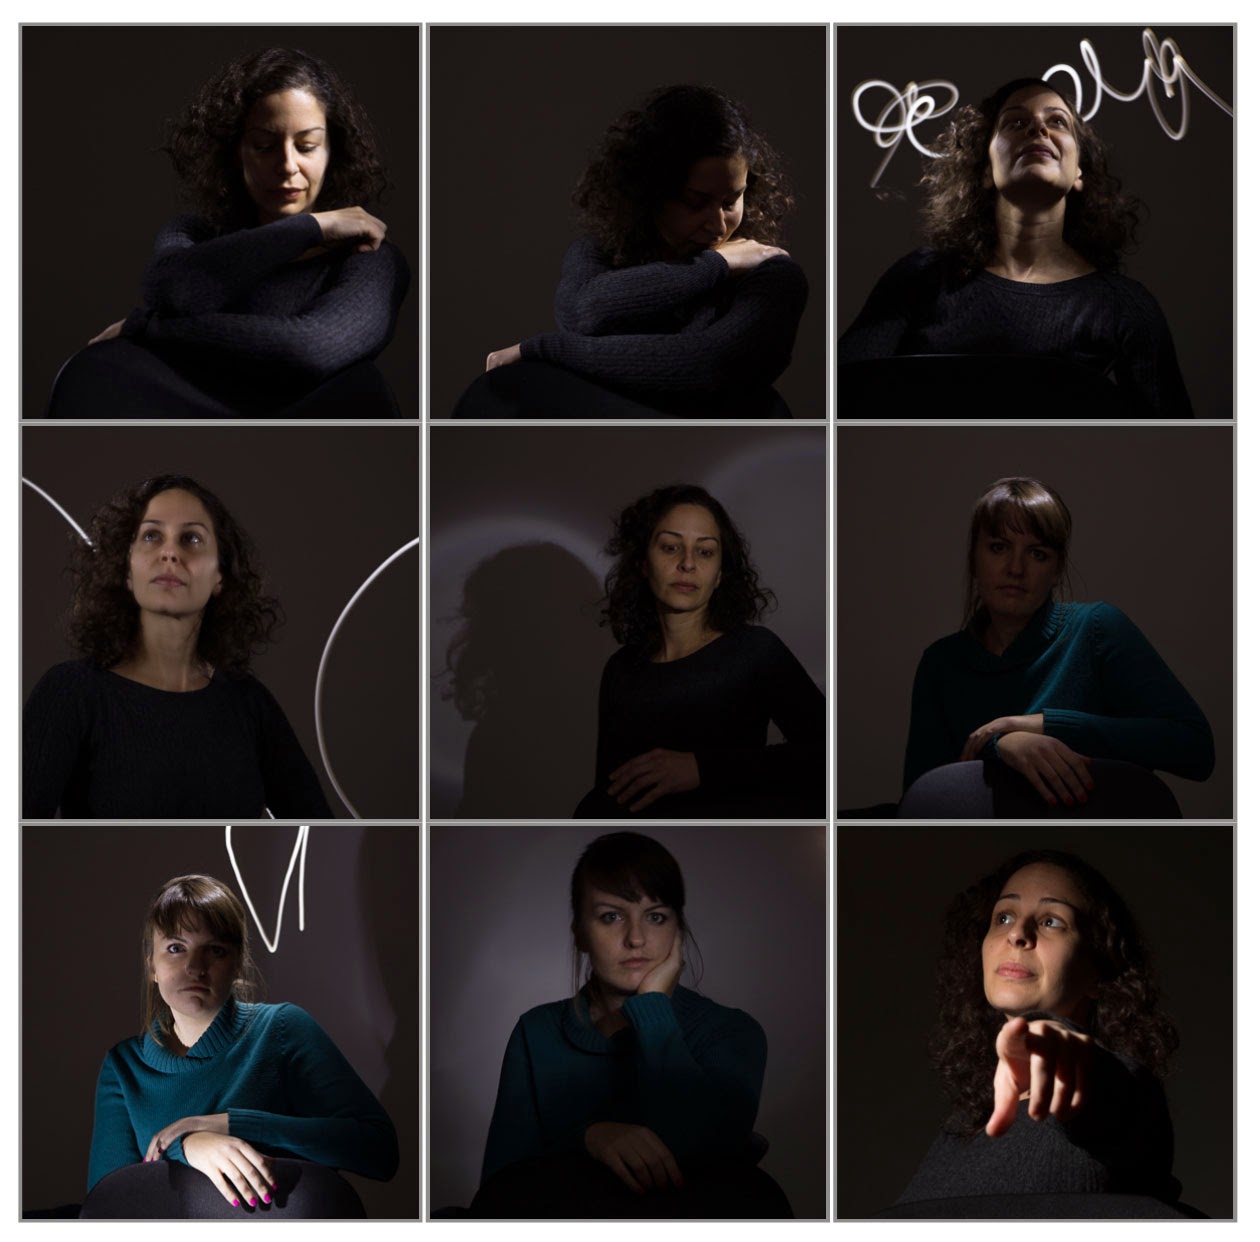
Multiple captures using a Canon Speedlite 600EX from different positions then combined as layers in Photoshop


A history of light painting can be seen here:
http://lightpaintingphotography.com/light-painting-history/
NY Times Lens Blog on Harold Ross' work:
http://lens.blogs.nytimes.com/2012/01/05/with-light-sculpting-a-photograph/?_r=1
NY Times Lens Blog on Harold Ross' work:
http://lens.blogs.nytimes.com/2012/01/05/with-light-sculpting-a-photograph/?_r=1
Much of this work is done with the light source pointed at the camera and recording the light source as it travels. I want to concentrate on another aspect of light painting and that is lighting a subject with the use of a continuous light source such as a flashlight or even a cell phone. Along with this idea of light painting is the idea of using multiple pops of a flash that is moved to different positions throughout the exposure. Since digital photograph has made it easy to combine images with the use of layers, it is now practical to make a series of captures with the flash in different positions and combine them in layers. The easiest way is to use Lightroom, selecting the images you want to use in Library Grid Mode, right click and choose Edit In… Open as layers in Photoshop. Now each layer can be controlled separately with the use of masking and any of the adjustment tools.
To make an image using a continuous light you will need to keep the camera on a tripod and the shutter open. This discussion is for the Canon 5DMII. Set the exposure for a length of time that will allow you to paint the light on the subject and the background (30 seconds is the maximum time allowable). The room has to be dark enough that it doesn't pick up any stray light during the long exposure. The f stop and ISO are determined by trial and error. With practice a rhythm will develop and improve your painting skills.You can also use the Bulb setting but the shutter has to remain depressed during the entire exposure. You can use the Canon Remote Switch RS-80N3 to release the shutter and keep it open by exposing the red dot on the release handle. Slide the mechanism to close the shutter.
To make an image using a multiple flash image you are going to actually make multiple captures with each exposure having the flash in a new position. With the camera on a tripod and the flash in one hand you setup the remote exposure as outlined below. A special cable is needed which is outlined below.
Remote Camera Setup

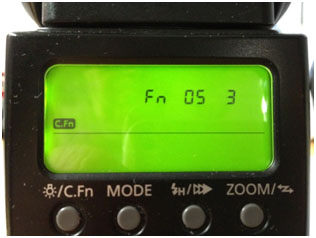
We learned how to remotely trigger the 5D MII by using a special cable called the Canon N3 to mini phone by connecting the N3 side to the Canon's remote control terminal and the mini side to the Pocket Wizard II's camera port. By setting another Pocket Wizard Plus II to the same channel as the one attached to the camera, the camera shutter can be released by the remote Pocket Wizard Plus II when you press the test button remotely. We need a third Pocket Wizard Plus II to be attached to a Canon 580EXII (this is the only Canon flash with a pc connection) using a pc to mini cable. The pc end is inserted into the flash's pc terminal and the mini end is plugged into the 3rd Pocket Wizard Plus II's flash terminal. The 3rd Wizard has to be set on a channel that is one number higher than the other two Wizards. The 580EXII is set on External Manual Metering by using the custom function 5 option 3 as described below. Now we have the 580EXII and 3rd Pocket Wizard Plus II in one hand and the remote camera firing Pocket Wizard Plus II in the other. As we point the flash where we intend the light to land, we push the test button on the 1st Wizard and it trips the shutter and then automatically uses the pocket wizard mounded in the camera's hot shoe to sync with the flash and 3rd PocketWizard that is set on the next higher numbered channel. The subject needs to remain perfectly still and then as many captures from as many positions can be captured.
To use the flash on Manual External Metering you will need to set the custom function on the flash. There is a external reflected light sensor on the front of the 50EXII that will read the light where the flash is pointed. Press and hold the light symbol/C.Fn buttom for 2 seconds. Use the scroll wheel to find the #5 custom function and press the Sel/Set button and scroll down to #3 and press Sel/Set button again.
To set the ISO and f stop: Tap the SEL/SET button so that the ISO is blinking. Use the wheel to select your ISO then tap the SEL/SET button again to set it. Next tap the SEL/SET button twice so that the f stop is blinking. Use the wheel to select your f stop and tap the SEL/SET button again to set the f stop.

How to use the PocketWizard Plus III for light painting


How to use the 600EX for light painting

Assignment 11 Light Painting
1. Make a photograph using flash as a painting tool.
2. Make a photograph using a continuous light source as a
painting too.
painting too.
Plan what you want to achieve with light painting. The
lighting scheme should be hard to achieve conventionally.
lighting scheme should be hard to achieve conventionally.
Wednesday, November 6, 2013
Lesson 10 Using the Canon Speedlite ST-E3-RTand the 600EX-RT with the Canon 5DMIII
Bruce Dorn's Introduction to Canon's Speedlite's system click here
Quick Guide to Speedlite Transmitter ST-E3-RT Setup click here
There is a way to adjust the Speedlite setting on the 5DMIII. Check out where to find Flash Function Settings in the 2 pages from the camera manual. You might find it easier to make adjustments:


Quick Guide to Speedlite Transmitter ST-E3-RT Setup click here
There is a way to adjust the Speedlite setting on the 5DMIII. Check out where to find Flash Function Settings in the 2 pages from the camera manual. You might find it easier to make adjustments:


Assignment 10 Canon Transmitter ST-E3=RT and 600EX-RT Flash
Work in Groups in the Studio for this Assignment. The group will produce 1 of each pictures in the assignment. Rotated jobs so everyone gets to set the St-E3-RT transmitter.
1. Make a portrait using the ST-E3 as the Master and a single or multiple 600EXs as the slave A on ETTL and modify the light coming from the 600EX to a broad source of light. You can use diffusion, umbrella, soft box or bouncing off a wall or card.
2. Make a portrait using ETTL ratio mode, the 600EX used as direct light and setup like our Rembrandt lighting with the clamp lights. Each 600EX should be set on ETTL and each with a different letter A,B and C. A is the Key light, B is the Fill light and C is the background light. Set the ratio between A and B to 4:1 and set the background light C manually until you like what you see.
3. AM class's demonstration was different than PM class's demonstration. You can use either method.
AM Demo: Make a portrait using the Gr mode and the same light set up as 2. Set the Master to GR and set A, B and C to M. The three slaves will set themselves to M after the 1st shot. Use the ST-E3-RT to adjust the setting manually to get the same results and you did in #2.
PM Demo: Make a portrait using the M mode and the same light set up as 2. Set the Master to M and ratio to A:B C. The three slaves will set themselves to M after the 1st shot. Use the ST-E3-RT to adjust the setting manually to get the same results and you did in #2.
4. Make a portrait using the Group mode and the same setup as 2. Set the Master on GR and set A to ETTL, B to M and C to Ext.A A or the Key light is set automatically but the fill will have to be adjusted manually. The Ext.A will render what every it is pointed at to 18% grey.
Write down all the settings you end up with for each shot. Exposure, exposure compensation(if any), Mode, setting for A, B and C.
Subscribe to:
Comments (Atom)