Using classic Rembrandt lights (45 to side 45 up) create a portrait with key (150 watt bulb), fill (75 watt bulb) and backlight (special spotlight bulb or 75 watt bulb).. Use an EV between 1.5 and 3. Check the class blog under Lesson 4 to see how it should be laid out.
Using three lights invent your own formula.
Post one separate finished photograph for this one

Wednesday, September 25, 2013
Lesson 4 Three Light Portraits
Inspirational Portraits

Hurrell's Fleetwood Mac Images from 1980

BSJTKM7B+w~~60_3.jpg)


How to layout the 1st part of the assignment

How to use the Sekonic L-358 to calculate EV diffence between the Key and Fill lights:
1. Read the Key light
2. Press the Memory Button
3. Press the ΔEV Button
4. Read the Fill light while keeping the Measuring Button Pressed


Wednesday, September 18, 2013
Assignment 3 One Light Portraits
Using the 250 watt halogen bulb in the equipment closet, make a portrait by selecting a quality and direction of light to communicate an emotion that you feel about a person. Make an additional portrait that reflects the opposite feeling you have about the person. Explain in writing the laws of light that were at work in each portrait.
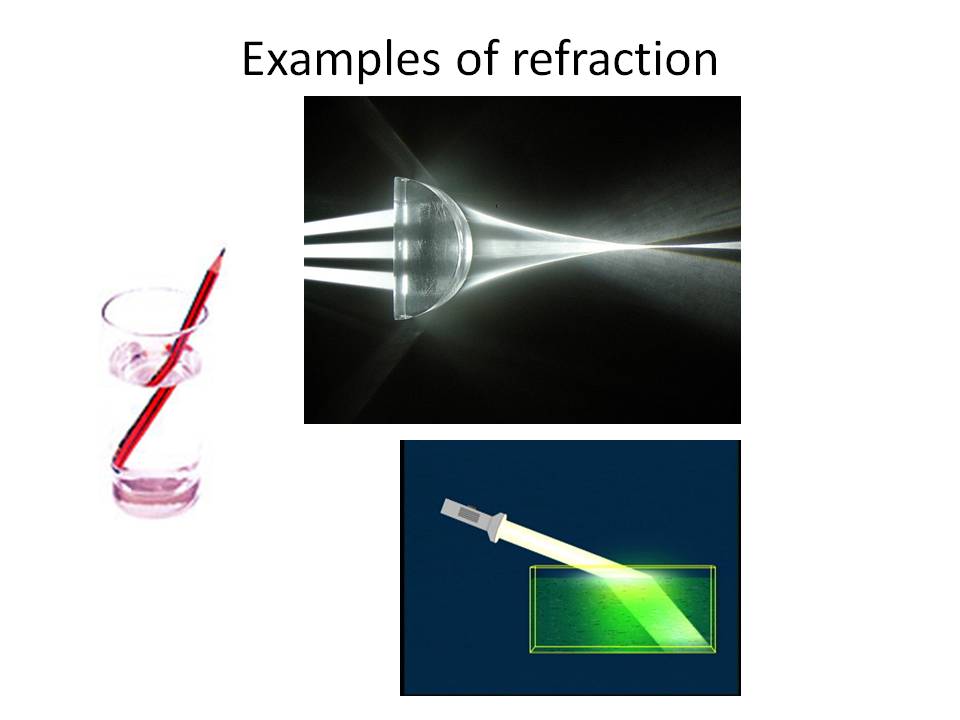
Lesson 3 Refraction, Diffusion, Direction of Light and Using One Light
 |
| More on Rosco's Website |
 |
| Five things that happen when light falls on a form. |


In class results

Light just above the camera lens

Light moved up and to the Left
 |
| The Fresnel Lens |


One Light Portraits

Production Stills
Thursday, September 12, 2013
Lesson 2 Angle of Incidence and Straight Line
Using pool as an example of angle of incidence = angle of reflection.


Examples of different surfaces reflecting a beam of light.

How a parabolic reflector works.

Light travels in a straight line we used a camera obscura to illustrate the law.

Our experiment with different size light sources and a 5" hole.


An illustration of how a rough or matt surface effects the angle of reflection.

Examples of different surfaces reflecting a beam of light.

How a parabolic reflector works.

Light travels in a straight line we used a camera obscura to illustrate the law.

The larger the whole the less sharp the image is.


Our experiment with different size light sources and a 5" hole.
Wednesday, September 11, 2013
Assignment 2 Demonstrate the 3 Laws of Light in One Photograph
In one photograph using one light source clearly demonstrate the 3 laws of light at work. Include the light source in the photograph. The subject is the light. Think of it as more of a physics project than a photograph. Use a dodging tool (I didn't explain this in class but think of a darkroom dodging tool as a gobo or flag) to prevent the light from flaring the lens. Try to crop out any ridging you might use and make the image about the light.
Thursday, September 5, 2013
Assignment 1 Inverse Square Law
1. Using 3 identical 4x5 grey cards set 1 foot apart, overlapping slightly and placed at a 45 degree angle from the camera angle. Make 4 photographs of the cards with the light 2 feet, 4 feet, 8 feet, 16 feet and 32 feet from the middle card. Use an incident meter on the middle card to give the correct exposure. The middle card should have the same value on each photograph.
2. Use 3 4x5 cards a black card in front, a grey card in the middle and a white card in the back. Using the same single point source make all 3 cards appear to be the same value. You can move the cards and the light source until it works.
Lesson 1 Inverse Square Law
The inverse square law states that the intensity of the light from a point source diminishes inversely to the square of the distance. I=1/d² Here is a better illustration that what I drew on the white board.


Here is what the results of shoot should looklike with the middle grey card adjusted in Lightroom and tweaked in photoshop to look the same. You can see the Front card gets darker in relation to the Middle card as the light is moved further away and the Back card gets lighter as the light is moved further away.

Here is an example of the results of adjusting the distances of the black, white and grey cards.

Monday, September 2, 2013
Setup a Blog for this Class
Create a blog on bogger using your google account and use the simple template.
Send the url for your blog to ccs@nyc.rr.com by next Monday.
Send the url for your blog to ccs@nyc.rr.com by next Monday.
Syllabus
Instructor:
Chris Callis
The
Laws of Light and How to Break Them
Fall
2013
Wednesday
10:00am-12:50pm and 3-5:50pm
Location:
SVA MFA Photo Studio
Who should take this
class:
Anyone
interested in learning photographic lighting.
No prior knowledge of lighting is required.
Class Description:
This
course is an opportunity to learn the laws of light and to gain an appreciation
of how important an understanding of light is to a photographer’s process. The
class will begin with an exploration of the physics of light in order to
explain its behavior. The weekly sessions and assignments will teach the
student how to approach every lighting experience with confidence. The purpose is to master these concepts and
to ensure effective application of this knowledge. The ability to problem solve
is a crucial element when faced with challenging lighting situations and
without this understanding it is very difficult to move beyond obvious
limitations. The ultimate goal is to be able to apply these concepts and then
to see all the possibilities.
Assignments:
Each
week there will be a demonstration and a class exercise that will end with a
weekly assignment. There will be a total of thirteen weekly assignments and one
final project.
Each
student will post their weekly assignments on their lighting blog along with a
sketch and brief explanation of their results.
Grading:
A
commitment from the students is expected. Being on time, prepared with homework
and ready to learn are requirements. Active
participation during the demonstrations is also required. The student’s aesthetic approach to lighting along
with the blog presentation are factors in grading.
Schedule:
Lesson 1: Inverse Square Law
Lesson 2: Angle of Incident, Light Travels in a Straight
Line
Lesson 3: One Light Source
Lesson 4: Three Light Source
Lesson 5: One Strobe
Lesson 6: Size Matters
Lesson 7: Strobe and Continuous Light
Lesson 8: Hand Flash
Lesson 9: Outdoor Flash
Lesson
10: Light Painting
Lesson
11: Shiny Metal and Glass
Lesson
12: Night Photography
Lesson
13: Stop Action
Lesson 14: Bring in a lighting problem to solve
Lesson 15: Review final assignment
Subscribe to:
Posts (Atom)